
When things are done either manually or automatically these processes can be very similar or radically different. However, making the switch from manual to automatic can sometimes be accompanied by avoidable pitfalls. Here you'll find a few tricks that might be helpful when you automate a process.
So you’ve done your homework, and you have looked at the processes in your factory, to determine which one(s) could be automated. One of them is an inspection station. It seems fairly easy; the parts come in right after the deburring process; an operator has removed any burrs present on the part, creating nice rounded edges. At the inspection station, an operator takes a part from a bin. He inspects it for cracks, stains, pits, etc; any visual defect that could indicate potential damage. Then s/he fills out a tracking sheet, indicating where the defects are (if any), and places the part on the sheet, in another bin. Next to the inspection place is another station, with a welding operation. Sparks and flashes are at a safe distance, but the operator notices it from time to time, out of the corner of his eye.
You’ve read somewhere that inspection processes could be automated. You present the project to an automation expert, who says “woah, that’s one complex process”. Really? Well, yes and no. The process, as it is, is fairly simple, but it has some variables; let’s look at them, and see how little changes can help a lot.

Parts are randomly presented
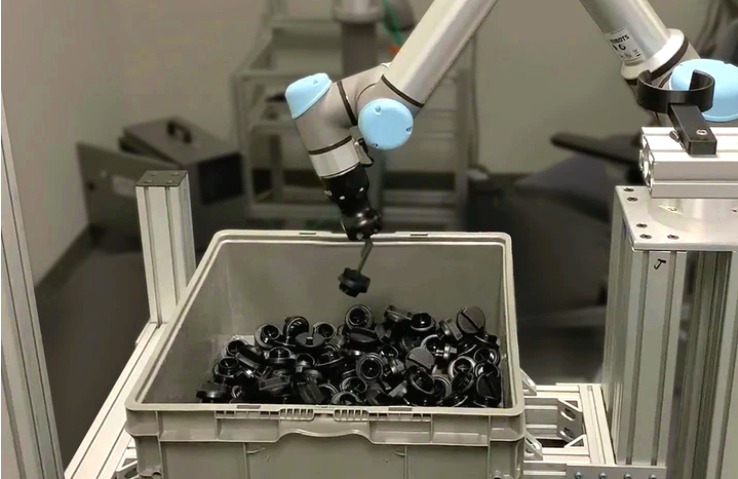
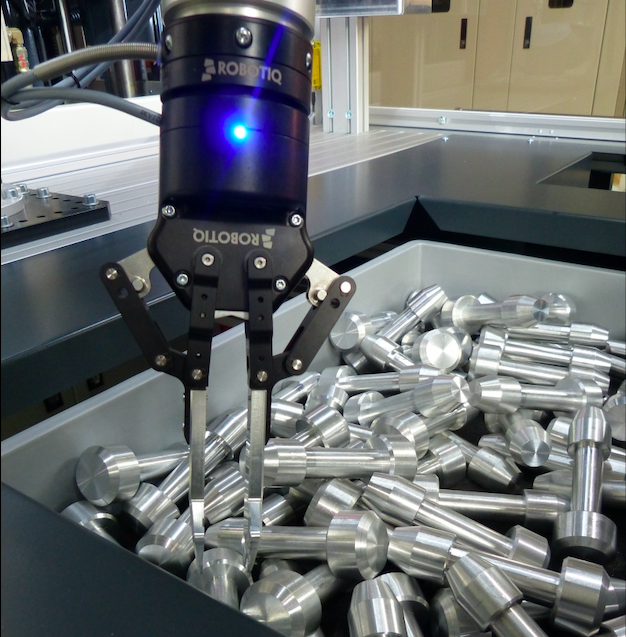
Picking up parts from a bin with a robot is something that can be automated. You would probably put a smart camera on a robot and program it to detect certain patterns (let’s say, a round feature that’s always at the same place on the part). Then, the robot would use its gripper (adaptable ones can be handy in these cases) to pick up the part based on the path that has been predetermined.
Potential problems can include overlapping parts. Then the smart camera might have a hard time locating them properly. If ‘optical conditions’ are not optimal (light is too low, or the part is dirty), so that the round feature is not easily visible; the scanning process might end up detecting no parts, even though you have 3 that are present in the bin. Also the picking process might take a while, if the robot has to scan the entire bin in order to find the parts.
These potential pitfalls could be avoided with a simple solution: you could design a tray, with individual pockets, where the parts could be loaded.

In this case, the robot would always use the same path to pick up the part. The robot would only have to shift its position by a fixed offset, let’s say 2 inches in the Y-axis direction (from A1 to A2) for the next part.
This type of solution is quite cheap, but saves a lot of trouble. Plus, it has other benefits:
- part tracking is easier (they are classified and can be placed as if they were on a checkerboard)
- parts are less likely to be damaged by handling (they are not dropped on top of one another in the bin).
Part condition
In my article on the digital vs human brain, I’ve talked about how we, humans, adapt particularly well to varying conditions. In this case, the parts that come from the deburring process might have dust on them. But hey, we know what dust is, no need to worry, that’s clearly not a visual defect. Well, great! But the camera/image processer doesn’t know this. So you’ll either end up with false defect detection (the detected ‘defect’ being the dust), or you’ll tune your system to ignore the dust, which might cause it to miss other important defects. Is there an easy fix? Of course!
- If the dust on the part is easily removed with air, a blower could be added at the beginning of the inspection process. The robot would pick up the part (from the designed tray) and present it to the dust blower, continuing its path to the camera for inspection.
- If the dust is sticky or oily, then the parts could be cleaned prior to inspection. This would have to be a completely separate process, as you don’t want to cloud the camera lens during the cleaning process.
- Or you might consider rearranging when the inspection process takes place. Sometimes, the simplest solution is the best!
Switching processes

Talking about switching the order of processes… this might turn out to be a very good solution in the case mentioned above. The deburring process, that creates dust, could be placed after the inspection process. Also, if the part’s surface finish appears irregular, a tumbling process might be placed before the inspection process. With a more uniform finished surface, the determination between a defect and a ‘weird spot’ that is actually normal will be easier. However, you might have to take into consideration other factors, because changes to the surface finish can be really tricky.
Some manufacturing processes might mask visual defects. Others will make the surface more uniform, but also shinier, completely changing the optical behavior of the part. The inspection process might need to be adjusted to take these changes into consideration. My point being, if you make changes and switch processes, you should do it before you start your project. Similarly, if you hire an integrator to automate a specific process, and you make changes along the way even if you think they have nothing to do with the automation, keep the integrator informed. You might be surprised as to what changes on the part can affect changes in the automated process.
Changes in the environment
Usually, when a robot/camera duo inspects a part, it snaps a picture at a specific time. It then moves the part a bit, and takes another picture. It could repeat this move-snap operation an impressive number of times, let’s say 250 times for a complex shape. Each image is processed individually in order to find visual defects. The program bases its determination of a defect criteria on: contrast, color, size of the found anomaly. If environmental conditions change, the picture can be altered in such a way that it compromises the proper detection of defects.
Let’s say you are about to take a family picture – you want to avoid using your flash, so you have adjusted the manual settings on your camera, increasing the aperture and shutter speed. You snap your picture and check the result – perfect, the settings seem to be just fine. Now you take another one, just in case someone had their eyes closed in the first picture. But just when you snap your picture, your brother-in-law takes a picture, with a flash! Whoa, what a saturated picture you end up with! Everyone looks quite whitish, and you have a hard time distinguishing features.
In our inspection case, the welding station right next to the inspection station might create the same kind of problem. The camera is programmed to snap pictures, with an adjusted shutter speed and aperture. It can also control the light intensity in the robotic cell, but it could be influenced by a surrounding lighting change. But what about the operator? Wouldn’t he be bothered too? Well, he might be, but if the welding station only flashes once in a while, it won’t bother him much. The operator does not snap individual pictures – he works much more like a video, scanning the part continuously. If he sees a few flashes once in a while, his eyes will still be on the part in the next millisecond, when the flash is over. Of course, if these flashes occur all the time, his inspection might be compromised too, but that’s another story.
Back to our automation case– what should be done to avoid these problems?
Here again, simple solutions will depend on the flexibility you have. The obvious solution is to move your inspection station elsewhere on the shop floor. Beware of other light sources that might create the same problem – neons that flicker, windows that bring in daylight, etc. Another solution is to enclose your automated inspection process in a cell with tainted windows. It’s good practice to have at least the top panel completely dark (you don’t really need a window there anyway), and side panels can be only partially tainted, depending on the context.
Of course, this is only one example of one specific process, but the same principles apply to most processes. As is explained in this great article, you should control as many variables as possible in order to simplify the automation of a station or process. The article gives the example of a forklift driving by a weigh station that disrupted the weighing method used in their quality control process. But as you have learned in this blog post, you can make small changes that will make a big difference and simplify your automation project! For more information on getting started with collaborative robots sign up for our learning kit.


Leave a comment