How a Machine Shop Analyzed its Collaborative Robot Integration

Posted on Mar 21, 2016 11:30 AM. 5 min read time
In today’s present context it is often the case that manufacturers need to increase productivity with very few disposable resources. To do so, automation is often used. In manufacturing processes such as machine tending (loading and unloading a CNC machine, for example), there are various ways to increase your productivity. Once you have optimize your setup and programming paths, determined the best tool and increased your product quality, what can be done next? Well, you can automate the loading and unloading process. This doesn’t have to mean layoffs, these employees can be repurposed to more decision making or dexterous jobs (product quality, setups, tool preparation, etc.). Before automating this part of the process, what are the different steps you might want to look at? Well, we have just created an analysis that will help you figure out what you need to determine if your potential application is easy or hard to automate.
We have released a series of articles and an eBook about 'Getting started with Collaborative Robots'. This series was focused on the main principle of robot integration. In order to provide more supporting data for this eBook, we decide to test our methods by visiting one of our favorite machine shops. Here we analyzed a machine tending application that could potentially be automated. We put ourselves in the position of the workfloor manager to understand what his concerns were about the potential robotic integration. Our analysis consisted of accumulating as much information as possible on the process when no robots were involved. Once we had all this information, we could look at the robot/gripper/cell selection and determine if the transition to automation was really feasible. So here we go.
1. VIDEO
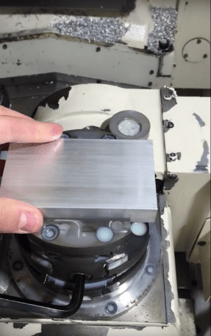
Before starting the analysis, we took notes and videos about what was happening throughout the whole process. This helped in figuring out and separating all the fragmented steps in the application. Here's an example.
2. Part Presentation
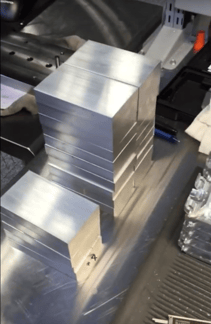
This is the starting point of the application, someone picks up a part. So the simplest way to analyze this part of the process is to take a photo or video of what is going on here. In this particular case, parts were piled one on top of the other and they were processed one after the other starting from the highest in the stack until the stack was empty. There was no exact part count in the stack.
3. Parts
Another important part of the process is to know exactly what kinds of parts are used; as much detail as possible is important for this step, because solid rigid parts will allow for different handling parameters than soft, brittle or fragile parts. This is not to say that soft, brittle or fragile parts cannot be handled by a robot; just that the material properties of your parts will have to be taken into account in your automation setup. In this case, rectangular aluminum parts with dimensions 4.35’’ x 2.51’’ x 0.755’’ (110.5 mm x 63.75 mm x 19.2 mm) were used. These parts weigh 0.8 lbs (0.36 kg). They are pretty rigid and only have flat surfaces which make it arguably one of the easiest parts to handle for a robotic gripper. We used these parts, because we didn’t want to make things too complicated for explanation purposes.
4. Task
The manual part of machine tending is pretty straightforward. You place the part at the right spot in your CNC or other machine and you're all set. In this particular situation, the parts are placed in a vice and positioned using a caliper. The total width of the raw part is 0.100'' (2.54 mm) larger than the final part. This means that any misplacement will create a defective part. In other word you absolutely need to place the part in the correct position. Once the part is positioned, the worker has to secure the part in place using an Allen wrench to tighten the vice. This part of the process, tightening the vice, may be the most difficult aspect of this application to automate. This is because it is not always feasible to apply high levels of torque with a cobot arm. Therefore, an alternative might be for this step to be automated by using an automatic vice.
5. Integration with Other Machines
One of the most complex parts of a machine tending application is actually using the CNC machine... So, by now you have figured out that placing a robot in front of the CNC machine will not solve all your problems, especially if you have other applications to accomplish with this machine (Surprise, Surprise!). Perhaps, the robot will be dedicated to inserting and removing parts in the CNC while you concentrate on fixing small irregularities and other nonconformities in the resulting product. However, to interface the robot and the CNC machine will be crucial to the success of the robot integration.
To have the best integration possible the machines (robot and CNC) need to share an interface. This means that both machines will talk to each other. They might say: ''My program is over, you can start'' and vice versa. Most people will think that introducing a timer into their program and running the robot at the very exact time the CNC machine is supposed to stop is a good way to do this. I am here to tell you, this will not happen in real life, there are too many variables to trust a timer.
Interfacing a robot and a CNC machine can be quite complex, however, it is doable. You should talk with your CNC machine vendor or local robot integrator to find the necessary information to accomplish this part of your integration.
6. Programming
In this analysis, we are discussing the robot side of things. Here programming might also be seen as a challenge. However, by using a collaborative robot, you can make this part of the integration a piece of cake. In fact, with teaching by demonstration and intuitive programming interfaces, cobots can be simple to use. Within a couple of hours you can be up and running.
CONCLUSION
To see the different aspects of the application and how we analyzed it, you should download the eBook we have created. Once you have read it, use this cheat sheet to analyze your very own application and to determine if it is hard or easy to automate. Using these tools along with different articles from our blog, you will be able to figure out whether you want to automate your process. If you have further questions you can always contact one of our application engineers and they will be happy to discuss your project.




Leave a comment