

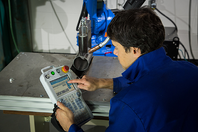
 We have put together two videos to help you get the most out of Kinetiq Teaching (KT). The first one shows you how to activate Kinetiq Teaching and the other one gives you tips and advice to boost your efficiency when using the Kinetiq Teaching solution. As a reminder, Kinetiq Teaching enables you to teach a welding robot by hand-guiding its arm through welding trajectories and easily set welding parameters with no in-depth knowledge of programming thanks to its intuitive interface.
This video shows you how to activate Kinetiq Teaching step by step:
Steps to Activate Kinetiq Teaching
1. Open the Kinetiq Teaching application- Select [ARC WELDING] on the Yaskwa main menu
- Select [KINETIQ TEACHING]
- Turn the key to the teach mode
- Check that the e-stop is in the released position
- Make sure that the Kinetiq Teaching mode is ON
- Enable the servos by pressing [SERVO ON READY]
- Press and hold the enabling switch
- Press and hold the [INTERLOCK]
- Press and release [TEST START]
- (The green executing light should be turned on showing that the robot is ready)
- Continue to hold the enabling switch + [INTERLOCK] to hand-guide the robot
Tips and Advice on Hand-Guiding a Welding Robot
1. Learn to feel the robot- Start by hand-guiding the welding robot with only one finger.
- Hand-guide the robot by applying one hand on the body of the welding torch.
- Apply force one direction at a time.
- Stay relaxed when applying force on the robot, not stif.
- Do not put your elbow on a surface when hand-guiding the robot.
- Do not touch the sensor when hand-guiding the welding robot.
- The speed icon shows the hand-guiding speed status
- Press on [FAST] to increase the hand-guiding speed
- Press on [SLOW] to reduce the hand-guiding speed


Leave a comment