How to Control a Robotiq Gripper

Posted on Aug 25, 2015 2:24 PM. 5 min read time
At Robotiq we have been driven by the goal of making robotics integration achievable with the minimum robotics knowledge possible. But since our products are not always used on collaborative and easily programmable robots like Universal Robots, we still need to support a wide range of protocols. This post aims to give you an understanding of how our Grippers communicate and behave.
The Basics
Let's start with the basics. We are always trying to encapsulated and handle all the picky and complicated stuff about grasping on our side, leaving the user the ability to easily understand the functions for the tasks they want to do, focusing on results and not technicalities. For that, we have taken a global approach that can be implemented regardless of the communication protocol used. Let's see how this communication works with our Gripper.
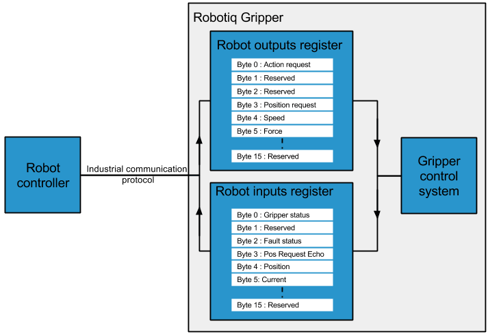
Basically, the Gripper has 2 banks of registers; inputs and outputs. The way this information will be read and written to in these registers depends on the protocol used, but the behavior of the Gripper in respect to these registers will remain the same for every protocol supported. From the robot’s perspective, output registers are the data that will tell the Gripper what to do. You can control the Gripper by changing values in these registers. Secondly, also from the robot’s perspective, input registers are the data that will tell the robot what is happening with the Gripper. What this means for the user is that to trigger an action with the Gripper, s/he will need to write values in the output register, and to control the flow of the robot program, s/he will need to read the status of the input register for the Gripper to make decisions. Let's look at an example of what a basic routine would look like.
The Classic Program
The actions you want to program are :
- Activate the Gripper
- Confirm the Gripper received the "Activate" instruction
- Wait until the Gripper is activated
- Open the Gripper at position 0
- Confirm the Gripper received the "Open" instruction
- Wait until the Gripper reaches position
- Set the force to maximum
- Set the speed to maximum
- Close the Gripper at position 255
- Confirm the Gripper received the "Close" instruction
- Wait until the Gripper detects the object
- If object detected, trigger the next step of the robot program
- If no object detected, stop program
Now, let’s set what a program would look like to achieve the previous actions. The following program is written in pseudo-code. The numbers before each line refer to the previous actions we defined above.
Please note that our registers are 16 bytes long (16 registers of 1 byte) for input and output. For those who may be unfamiliar with the difference between byte and bit, please note that:
1 byte = 8 bits.
Depending of the communication protocol used, they must be set up to implement these 16 registers.
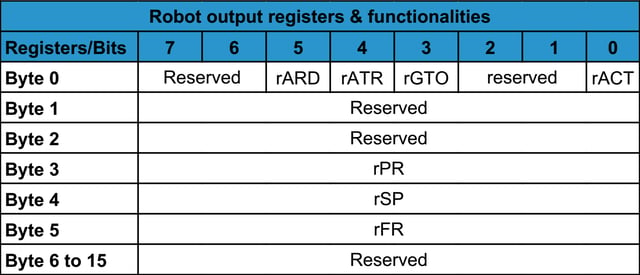
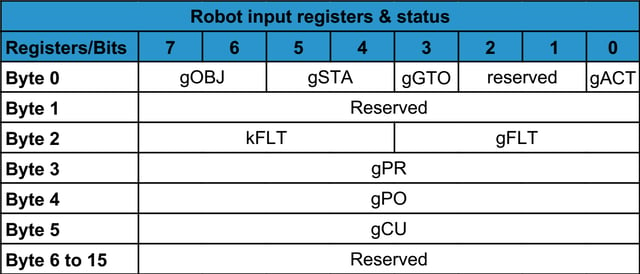
For a short description of the register name refers to the table below. For specific information about these registers, please refer to our official instruction manual.
Moreover
Sometimes our advanced customers expect to be able to control the Gripper in a closed loop mode from a robot controller or a personal computer. Our Grippers are not meant to be used this way. As I’ve said before, we handle the behavior of the Gripper on the Gripper side. By giving a position to the Gripper, you tell the Gripper to try to reach this position. Afterward, the Gripper programming will make the decision itself about acceleration, speed, force, object detection, etc. depending on the settings you have predefined. If for example, the user continuously sets new positions at High frequency (higher than 5-10Hz for example), the algorithm used to make these decisions will always be resetting to its initial state and then, the Gripper will look like it's shaky!
Hopefully this has cleared up some points on how our Grippers act and helped you to write smooth code for a smooth result. To get further information on communication protocols, follow the link below.




Leave a comment