

Our goal at Robotiq is to facilitate the integration of robotic grippers in automation processes. As integration includes everything from installing the gripper on the robot to the introduction of the gripper/robot arm into the manufacturing process. We want to make sure each step is the easiest possible for the end user. This is why we provide tools to accelerate the installation of our Gripper on most robots. Here we are introducing our new 2-Finger 85 Adaptive Gripper on a Universal Robots. Take a look at the different steps and at the video to see how easy it is.
UR Kit
To facilitate the integration process we are providing a specific kit to fit with the UR robots. In fact, instead of choosing all the necessary accessories, this pre-bundled kit uniquely designed for the UR robots will provide you with everything you'll need. This kit includes:
1. Robotiq 2-Finger 85 Adaptive Gripper (with silicone fingertips)
2. Mechanical coupling (with pigtail cable)
3. USB to RS485 adapter cable
4. Device cable
5. Required screws
6. USB stick with required files and drivers
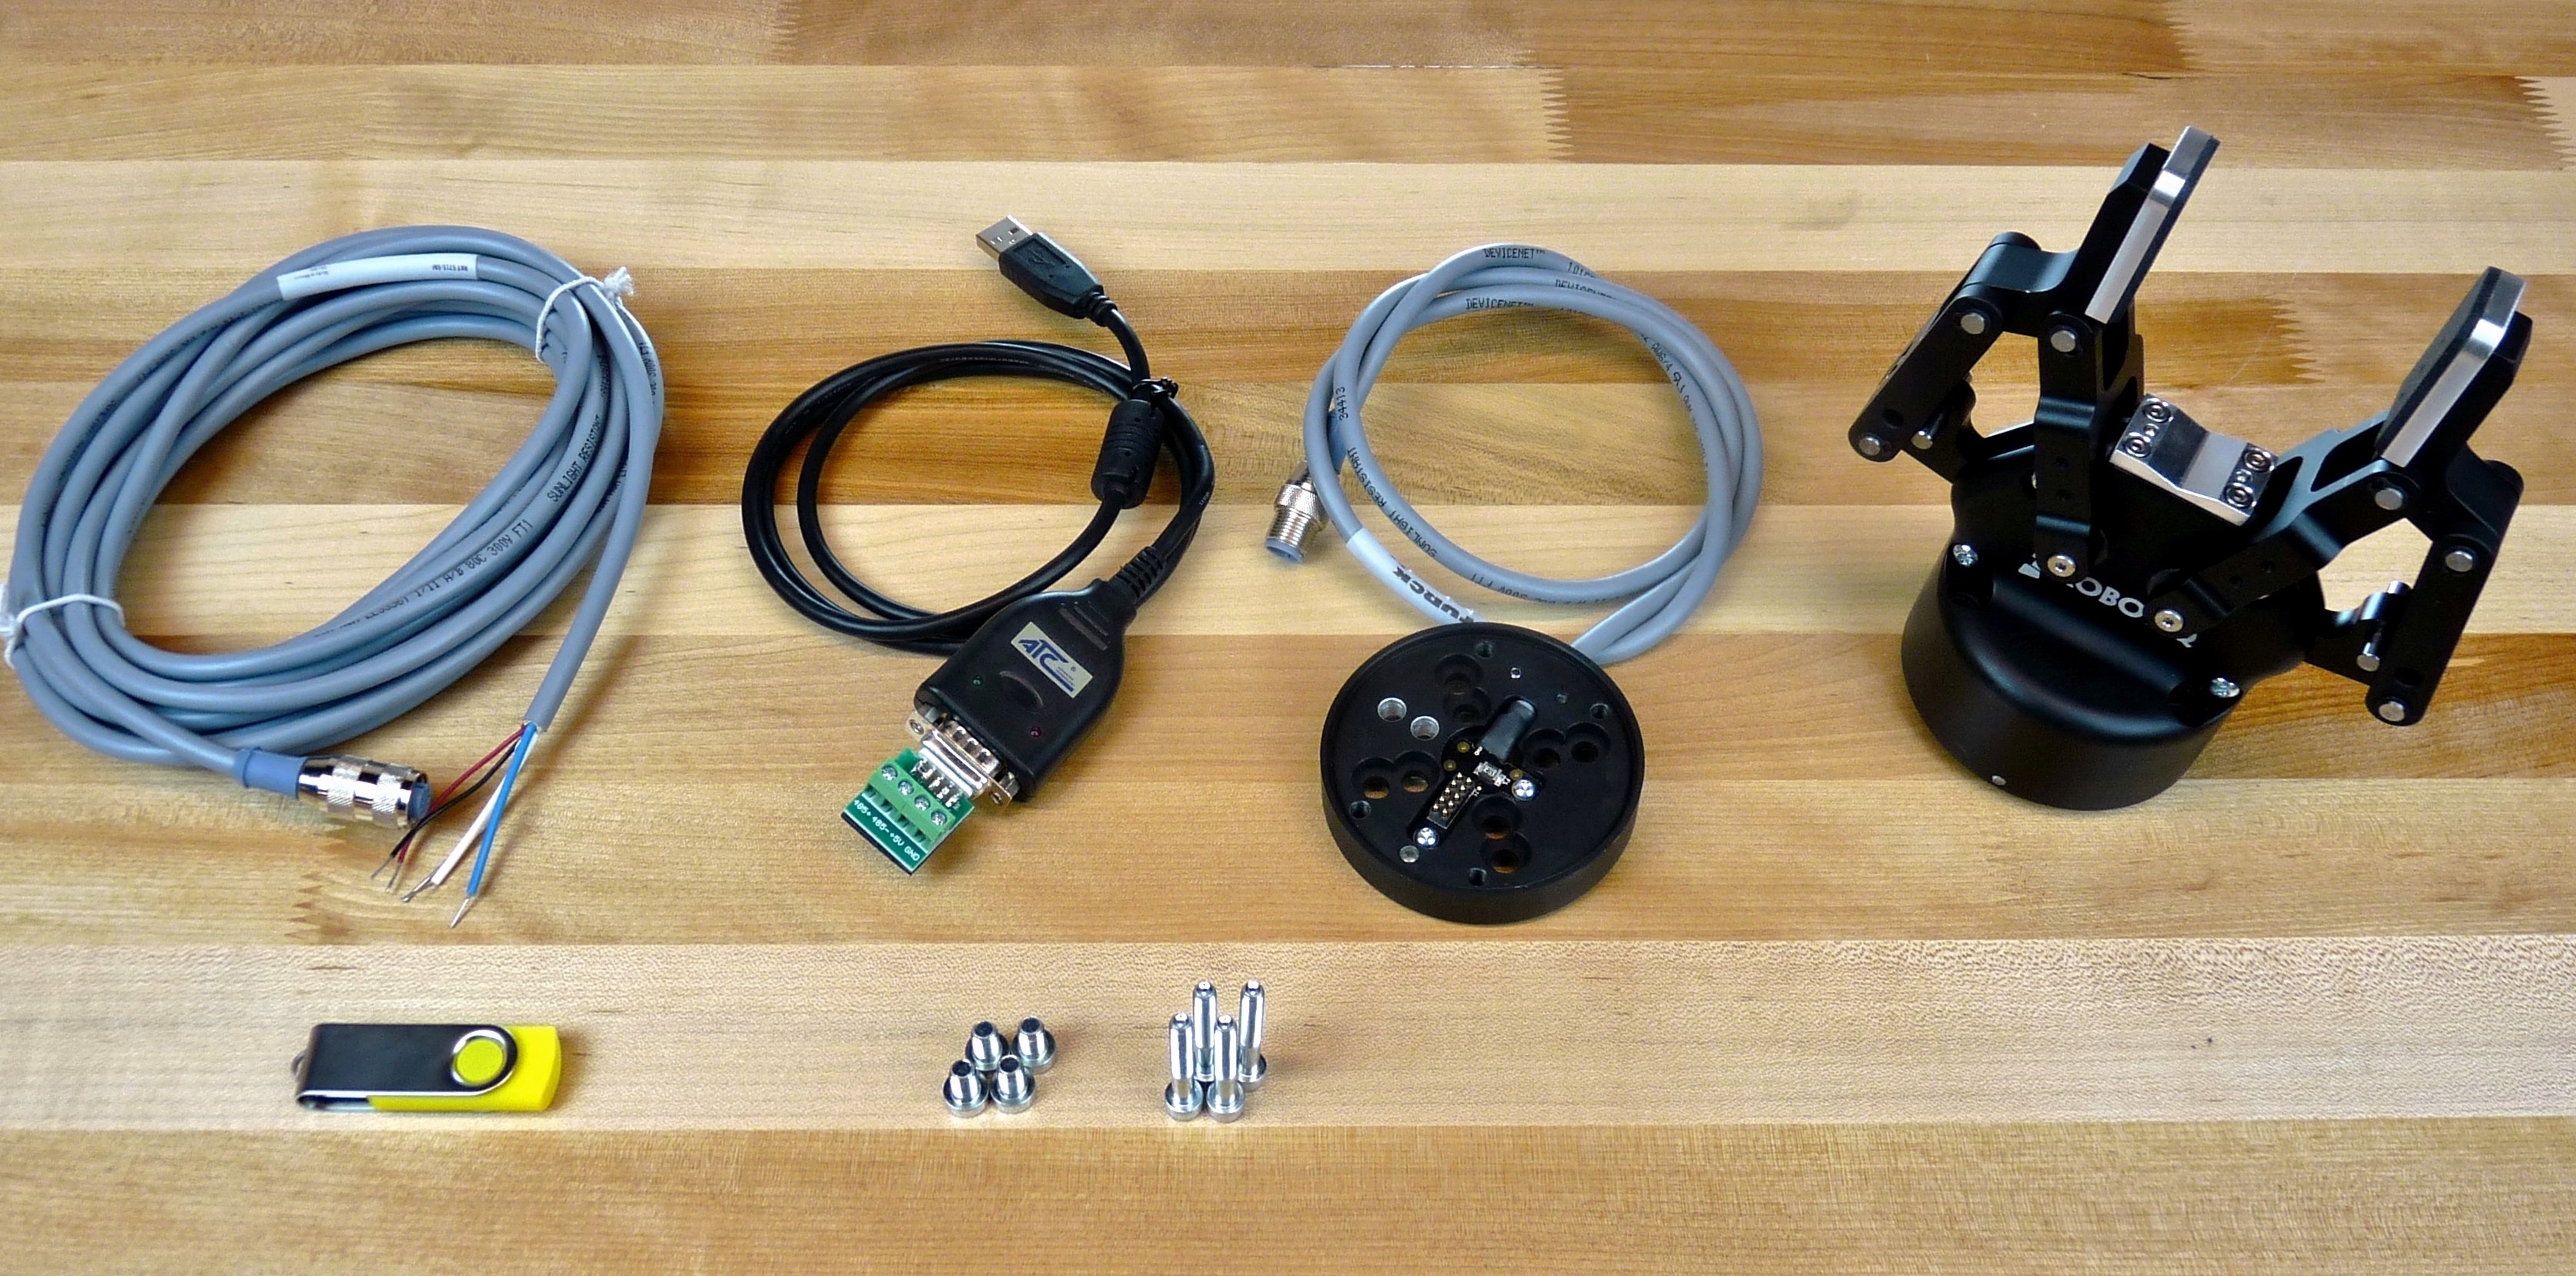.jpg?width=567&height=281&name=2014-11-05_2f85_v3_kit_ur_items_(1).jpg) We also recommend the use of a 4mm hex key, a 3mm slotted screwdriver and a couple of zip ties.
We also recommend the use of a 4mm hex key, a 3mm slotted screwdriver and a couple of zip ties.
Mechanical Coupling
The mechanical coupling is the link between the robot and the Gripper. It is provided with the proper bolt pattern to fit your robot. In this case, the UR bolt pattern is provided. The mechanical coupling has a pigtail cable, which means the communication and power are passed through this cable. This eliminates the need for secondary connectors on the Gripper.
Place the coupling on the robot (align the dowel pin) and fix the coupling using the four M6-1.0 x 10mm low head cap screws. You should tighten the screws using a 4mm Allen key and remember to use threadlocker on the screws to secure the coupling in place.
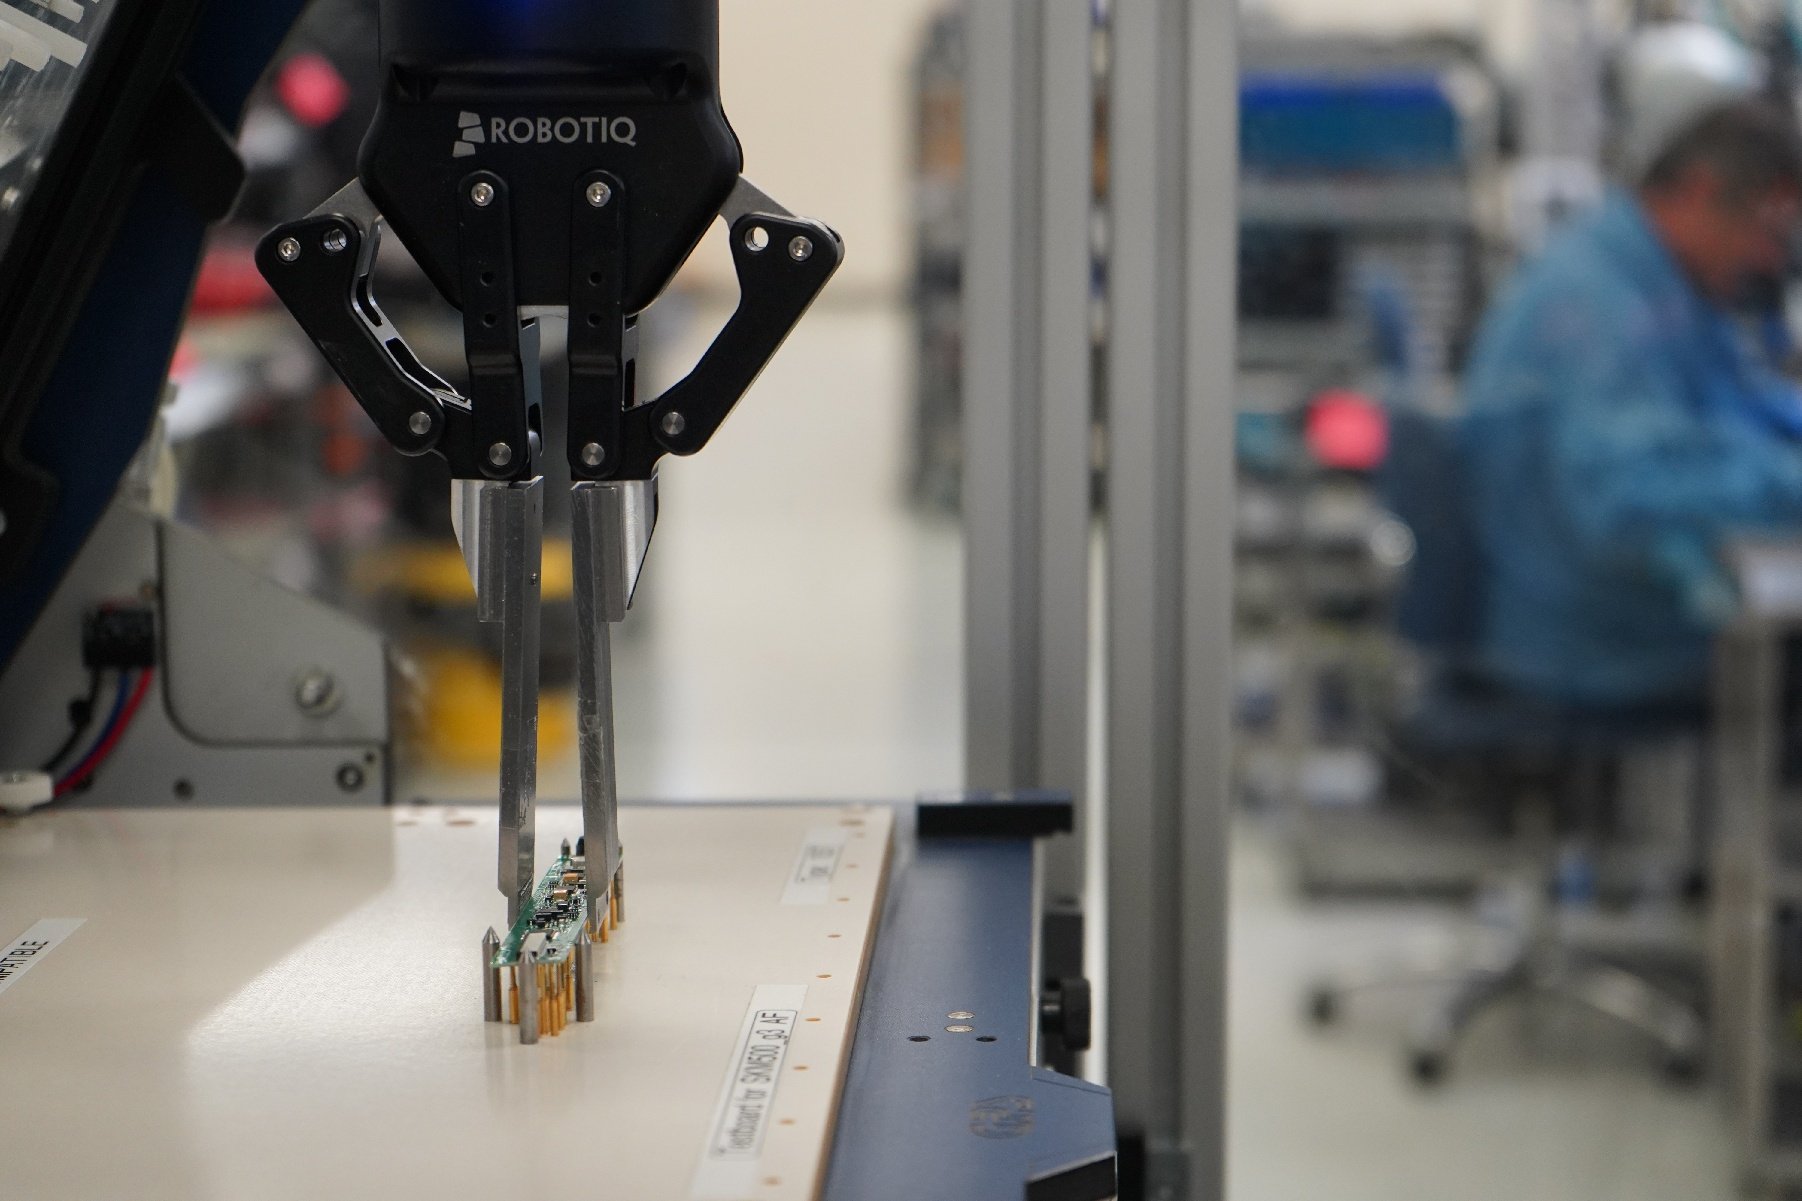
Gripper
 The Gripper is fixed directly on the mechanical coupling. Since the communication and power are passing through the mechanical coupling, you are not able to operate the Gripper without the coupling. Once the Gripper is aligned, you can now attach it.
Using the four M5-0.8 x 35mm socket head cap screws and threadlocking fixative, tighten the screws using a 4mm Allen key.
Connection
The device cable is the link between the Gripper (pigtail cable) and the communication cable (USB to RS485 adapter). Make sure to attach them securely to always maintain a proper connection even if the robot is moving fast or encounters an unexpected impact. To make sure the cables are not in the path of the robot, affix them on the frame of the robot using zip ties. Make sure to have sufficient give in your loops so that the cable is not tight or pulling in any situation.
The device cable should now be connected with the USB to RS485 adapter. The color coded wires related to communication from the device cable connection are:
-
White wire: 485+ (Adapter)
-
Blue wire: 485- (Adapter)
-
Bare ground wire: GND (Adapter)
The other remaining wires are for powering the Gripper. When using the robot controller power, the power cable connection is:
-
Red wire: 24+ (Robot controller)
-
Black wire: GND (Robot controller)
The USB to RS485 adapter should then be connected to the robot controller. The USB 2.0 end of the cable is directly plugged into the robot controller. The other end is connected into the adapter connector. Make sure to put the adapter cable in the robot controller and securely close the controller door.
Robot Control
We provide a USB stick that includes files and drivers to help you integrate the Gripper with your robot. In fact, by simply inserting the USB flash drive into the teach pendant the drivers and files are automatically introduce in the robot controller program.
You can then program different routines for using the 2-Finger 85 Adaptive Gripper.
Hopefully this short article will help you to understand how easy it is to install our Gripper on a Universal Robots. To encourage increased implementation of this automation team (Gripper and robot) we have worked hard, to make the setup easy, so that you wont have to. If you are interested in learning more about our Gripper, follow the link below.


.jpg)

Leave a comment