How to Control the 2-Finger Adaptive Robot Gripper?

Posted on May 21, 2012 in Robot Grippers
3 min read time
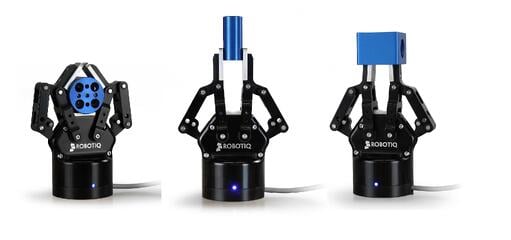
As explained in a previous article, the 2-Finger Adaptive Robot Gripper is able to achieve both pinching and encompassing grips by automatically conforming to the shape of the object. The Gripper is therefore simply programmed using straightforward open/close commands (everything else is taken care by the Gripper controller and the patent pending finger mechanism). In today's article, we'll take a look at how the Gripper can be controlled: how to communicate with it, how to perform simple actions, how to adapt its behavior and how to test the different commands.

How to Connect to the Robot Gripper?
The 2-Finger Adaptive Robot Gripper has a shared memory which can be accessed by its master (the robot). Some registers can only be read, for example to obtain the status of the Gripper, whereas other registers will also accept written commands . The read/write operations depend on the communication protocol of the Gripper which is chosen to be compatible with the robot. At the moment, the 2-Finger Adaptive Robot Gripper is compatible with six communication protocols, which makes it one of the most versatile products on the market. The current protocols are: EtherNet/IP, TCP/IP, DeviceNet, CANopen, EtherCAT, ProfiNet and ProfiBUS.
How to Send Simple Commands?
The first thing to do when the Gripper is powered up is to initialize it. The initialization procedure consists of fully opening the Gripper and is required to set the "zero" position of the Gripper (or its "home" position, if you prefer). When the Gripper is initialized, it will wait for its "Go to Position Request" bit to be set before moving towards its requested position. The position request is an integer in the range: 0 to 255 and is controlled by writing the appropriate number in one of the Gripper's registers (the third one, actually). The position 0 corresponds to the fully opened position and 255 to the fully closed position (there are software limits which prevent the Gripper from reaching these theoretical limits). Once the "go to" flag is set, the Gripper can be fully closed by writing 255 in the position request register (and fully opened by writing 0).
How to Change the Gripper Control Parameters?
As noted above, we can establish a position request from 0 to 255 to make the Gripper fingers move towards this reference. There are also two parameters that can be adjusted similarly (with values from 0 to 255): speed and force. The Gripper motor is primarily controlled using a speed reference. Therefore, adjusting the speed parameter has a lot of influence on the Gripper's behavior. The value 0 corresponds to the minimum speed (not zero speed!) whereas the value 255 corresponds to the maximum speed of the fingers. The force parameter modifies the maximum current that is sent to the motor prior to reaching the stop position. It is worth noting that the Gripper has an auto-locking mechanism which prevents the fingers from moving when external forces are applied on them. Therefore, the maximum current sent to the motor during the grip determines the gripping force. The value 255 sets the motor current limit to its maximum (evaluated to +/- 200N) value whereas the value 0 sets the Gripper to the lowest value to which the Gripper can properly move.
How to Test the Commands?
When the Gripper is received by the end-user, it is often useful to test its movement potential before placing it on the robot. This allows the programmer to experiment with the effect of the control parameters, to establish the best way to grip the part(s) for the targeted application or just to become comfortable with the Gripper before programming it for real. This is possible with our user interface which is distributed with the Gripper. The user interface is compatible with Windows XP and Windows 7 and most recent. The user interface allows you to modify all the control parameters and to read all the status registers.
Well, this explains in a nutshell how to control the 2-Finger Adaptive Robot Gripper. If you need more information, you can take a look at the control section of the user manual or, of course, you can contact us and let us know how we can help you!


.jpg)

Leave a comment