

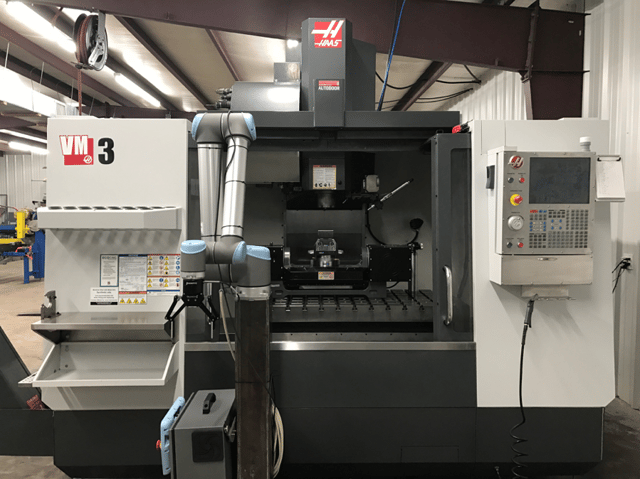
Somewhere in the fields of Mississippi is a man who owns a CNC Machine job-shop. Tommy Caughey has found the solution to his problems with Universal Robots. He was able to double daily production by running unattended shifts with his UR10. We already showcased his story in the WALT Machine Case Study. Today, Tommy brings us earlier into his automation journey, at the exact moment he got the robot and established communication with the CNC Machine, all by himself.
My intervention experience (or lack thereof)
By Tommy Caughey
"I have to preface this post with the fact that I had no prior integration experience and only limited electronics knowledge. I do have a mechanical engineering degree and understand circuits and how relays operate but that’s about the extent of my knowledge. My goal was to connect my UR10 to my HAAS VM3 and then eventually to my HAAS DS30 without paying for an integrator. Both of these machines are equipped with the HAAS autodoor option but only the lathe had the robot ready feature. The mill has custom automatic work holding that was installed prior and is actuated through the machine control. I should also note I only had a couple hours of experience programming the robot, mainly just showing it off to customers and friends.
My first thought was to have the robot and mill hand off control back and forth as each completed their tasks I would program loop to be performed on the mill control. Initially this made the most sense to me as I was much more familiar with the CNC interface. I figured it would be much easier to let the machine have most of the authority. After all, the robot was just swapping parts.
Of course my first step was Googling, “How to wire a robot to a Haas CNC”. I cannot express how many variants of that phase I searched through out the process, all to yield very few results. Apparently this isn’t published knowledge or I wasn’t looking in the correct place.
As far as operations go, I knew the machine had to open the door, and then send a signal to the robot using one of the existing programmable relays that come with the machine while the program was essentially paused. Next, the UR would swap the part and send another signal back to the machine telling the program to resume. This process presented 3 major issues: communication to the UR, communication from the UR, and the automatic door.
This was the easiest of my three challenges and actually worked correctly the first time. As I said my Haas mill (I think most or all) come equipped with 5 programmable relays built in to one of the control boards in the rear of the machine. This was the easy part; one wire from the robot digital input and one returning completing the circuit. On the robot side, I programmed a wait until that digital input turned on. On the CNC side, I would simply program that relay to pulse. I tested the functionality by running a machine cycle and the robot did load the part. Now I had to make the program resume.
Communication to the UR
As I mentioned before I needed to have my looped program pause for the robot to swap parts. If not, it would continue to run parts as the robot was loading the work holding and crash. After some phone calls to my local HFO, I learned that there are three ways, and codes, to program the relay. For example: I used relay M25. If I run M55 in a program the relay will turn on and stay on until reset is pressed or M65 is ran. However, if I run M25 the relay turns on and the program pauses till a return signal is received. This is exactly what I needed. My HAAS tech instructed me which pins to connect the wires coming from the robot to and so I did. I made sure to use a 24 volt relay as the UR was 24v and the CNC was 12v. At this point everything was coming together pretty well until I tried programming the doors.
Autodoor
I purchased my machines with the autodoor function in anticipation of one day automating my process. At the beginning and end of each cycle the door will open and close automatically if turned on in the settings. No extra programming needed, it just happens. You can control them using an M code though. So this is all I had left one M code to tell the doors to open then I was done. Well... not exactly. When you program the doors to open an alarm is thrown: “No safe cell signal.” After much additional searching and a couple phone calls, I learned it is a signal pulsed at a particular rate to certain pin on the control board which tells the machine that a robot is present. I did find three published values for the rate none of which I can recall.
One of these values ended up being correct and the alarm did go away. The next issue was when the machine was commanded to open the doors the interlocks wouldn’t release quick enough and the machine would alarm out just as if the doors were jammed. I know the obvious solution would seem to be, simply terminate the program and the doors would open automatically. However, this wouldn’t work because the loop would be over and some one would have to manually push the cycle start button.
At this point I was approximately two weeks into experimenting and getting quite frustrated. I decided to stop and regroup. I was getting nowhere. This method seemed like the proper way but it was complex. I’ve seen several YouTube videos of cobots manually closing doors and pressing cycle start buttons, but my robot would be moved around a lot and I didn’t want to have to reteach more than the pick and place locations. This did lead me to my final solution though. I would make the robot control the machine just like the human operator. This method had a few benefits: I only had to add 3 lines of code to my CNC programs, it solved the auto door issue, and it allowed me to deploy the robot quickly to machine.
With this new approach I was on the right track for sure, and most of the work was already done. All I had left was to make the connection from the robot back to the CNC cycle start button. I pulled the back panel off the CNC control, snaked my wires through to the button, and connected them. After a few test cycles of the system, I decided to replace the back cover and get to some actual work.
After doing so, with the excitement building to actually use the robot for its intended purpose, I pressed the cycle start button. Absolutely nothing happened. In fact the entire keypad quit working. I immediately removed the back panel again and regained all functionality. A few days and a phone call to an electrician friend later, I learned that the cycle start button was very low voltage. I also learned that the unshielded thermostat wire I was using temporarily to test the system was allowing an inductance to be created as it passed by the rest of the wires in the controller. This is was causing my keypad to malfunction. The solution was getting shielded wire.
Several days later I made a second attempt. Ensuring the shield was grounded well and the connections were made correctly, I replaced the cover again only to end up with the same results. The shielded cable had no affect. The only solution I could come up with was moving the relay from inside the control box to just before the cycle start button. Only having 1 inch jumpers from the relay to the cycle start button made it so no current could be induced.
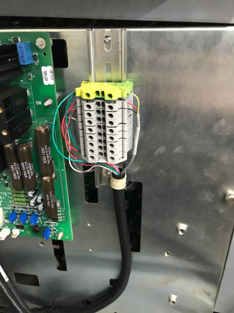
"A rats nest of wires"
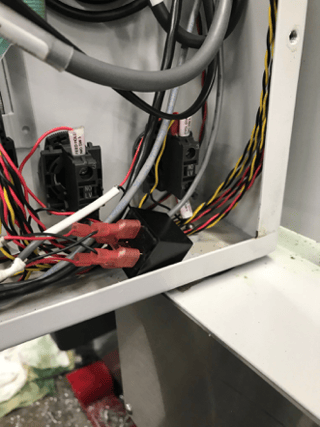
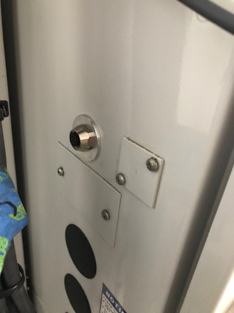
Now I finally had my cell operational producing parts, but it was a rats nest of temporary wires and electrical tape. It definitely needed some cleaning up. Going with the idea of being able to quickly redeploy my robot, I wanted to be able to roll it in front of my machine, plug it in, teach a my pick and place points, and get to work. Upon the recommendation of my local automation component distributor, I chose a Turk 8 pin quick connector. This saved me the time of putting wires into sockets and keeping track of where they went. I mounted a small piece of DIN rail in the power cabinet of my CNC and attached the terminal blocks to it. I then mounted the female side of the Turk plug on the cabinet wall and landed each of the wires to my terminal blocks. I neatly reran the wires to their connections. Eventually, I ended up purchasing an additional female connector for my HAAS lathe. After the lessons learned from the first machine, the second was much quicker. Consistency in the wiring allows for the same digital inputs and outputs to control the same machine functions regardless of the machine.
"Consistency in the wiring allows for the same digital inputs and outputs to control the same machine functions regardless of the machine."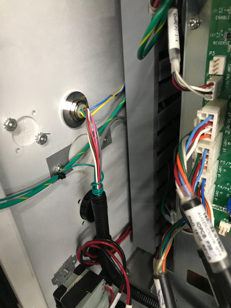
Even though the project was frustrating and time consuming, it was rewarding having my machine operate automatically without costing thousands of dollars. I wrote this post in hopes that it will help someone with their integration. At the time I couldn’t find anything worthwhile published. The most difficult part was finding out what wouldn’t work. It truly is easy once you know what to do; just a series of simple steps connecting sets of pairs of wires."


Leave a comment