

Have you integrated a vision system lately, and noticed some changes in its performance from one day to another? One tends to look for a problem related to the parts themselves – the difference might lie in the variations from one batch to another. But if you haven’t paid close attention to the light during your vision system integration, you might be surprised at how much it can influence your system’s performance. A vision system close to a window could work well on a rainy day but have various problems on a sunny day… That is, if you haven’t put in place effective measures to limit the impact of ambient light. Or the system could output weird results if you have not selected the appropriate lighting.
In this article, we talk about how important light is in a vision system. Well, let’s see what role the light has in your vision system. Light is used to:
- Maximize the contrast on the features of interest
- Minimize the contrast elsewhere
The better the contrast will be, the easier it will be afterwards to process your image. Of course, image processing algorithms can help maximizing the contrast, or smooth out some speckles, but the best is to have a sharp contrast before you actually process the image. Otherwise, well… as they say, garbage in, garbage out.
Dark field and Bright field
One key concept is the distinction between dark field and bright field.
- Dark field will show a bright feature on a dark background.
- Bright field will show a dark feature on a bright background.
Therefore, the image processing algorithm will have to search for bright spots on a dark background or dark spots on a clear background…

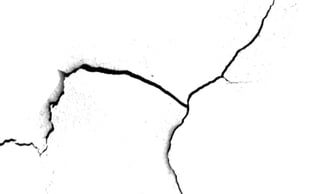
Dark field effect (left) and bright field effect (right)
The bright object (either the feature, as in the dark field effect, or the background, in the case of the bright field) corresponds to the light that comes back to the camera. And what light comes back to the camera? Well, that depends on the light you’re using, the material you’re looking at, and the physical setup you have. Let’s come back to these physics classes, shall we?
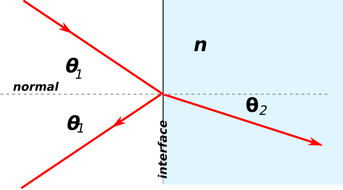
Reflection, refraction, does that ring a bell?
You don’t have to get your calculator out to compute angles, but just remember the principles: some light rays issued from the light will come back to the camera. Some other light rays will go through the surface. The other rays will hit the surface and be reflected somewhere else. So the position and angle of the light source (relative to the camera) is important, as well as the position and angle of the part you’re looking at.
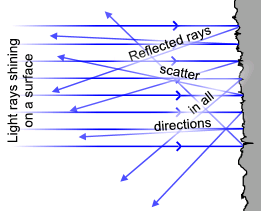
The material and roughness of the part is also important: imagine a bumpy surface: light will be scattered pretty much everywhere.
So coming back to our dark/bright field: dark field effect will occur when the light rays that come back to the camera have hit the feature you wanted to highlight. The other light rays, that have hit the background, have gone somewhere else (they have not come back to the camera, meaning the background will appear dark). The bright field is the other way around: light rays that have hit the background have come back to the camera, while the ones hitting the feature have gone somewhere else.
What Type of Light Should I Be Using?
If you have the option of selecting which light to use, here are a few options you might consider. As with any choice: having a lot of choices can give you a lot of freedom but it can also get pretty complicated.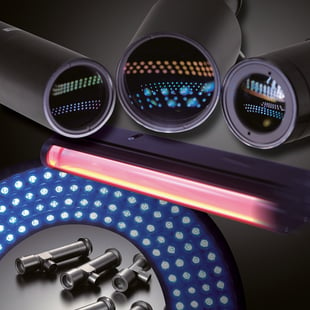
Lights come in different shapes, angles, sizes and wavelengths.
Here are some common light shapes: ring lights (they come in various angles), coaxial lights, bar lights, area lights, dome light, collimated light (parallel rays), spot lights, structured lights (used in shape-from-shading technique).
So which one should you choose? Your optimal choice will be based on the effect you want to achieve and the optical behavior of the part you’re looking at. For example, if you want to get a bright field effect on a specular (highly reflective) surface), you should consider using a ring light or a coaxial light. Ring lights are usually installed around the camera lens, while coaxial lights are installed in front of the lens (the camera is actually looking at the part through a semi-transparent mirror). They both give the impression that light comes ‘from the camera’. Therefore, your highly-reflective part that is facing the camera will reflect light directly in it. A rough spot will appear dark, since it will scatter lights in different directions.
Another thing to consider is the wavelength you’re using. Infrared and ultraviolet lights can be used to enhance of dampen some features. In this case, it is wise to also use infrared or ultraviolet filters in front of the lens.
As we have seen, the position and angle at which you’ll place the light is very important. Since every case is different, I invite you to consult this great book on lighting. It is intended for photographers, but the same principles apply on machine vision. Light Science and Magic: An Introduction to Photographic Lighting
You will be guided on how to select the best lighting for your application, based mainly on your part’s material, roughness, shininess, etc. and features you actually want to see.
Ambient Light Is Important
As we have seen before, the light coming in from windows could influence your vision system’s performance. There are other light sources in the machine’s environment: the neon overhead, there could be a process close by that generates flashes, a forklift with a light flashing could pass by, etc. Limit as much as you can light variation in the nearby environment from your vision system. Also consider using tainted windows around your vision process, or other masking material in order to have all the benefit from the light you want to use, without external disturbances.
And now that you understand the principles of lighting in machine vision, why not apply those principles the next time you take a family picture?


Leave a comment