

Most of the time, the choice of a gripper can be narrowed down to: Can I use this Gripper for my applications? Even if the gripper has awesome specifications, if it cannot grasp the right object or execute the required task... it's not the right gripper for your application. This article presents numerous strategies that we have seen over the years on how you might best use a gripper in different applications.
Use the Proper Fingertips
At the end of the day, the object that is grasped by the gripper only touches the fingertips, right? So to optimize your gripping force or even your gripping strategy you might need to use a different fingertip. In fact, by using a customized fingertip, your grip on the object should get better and this will ensure a more reliable process.
Why not use the regular fingertips? Well, it is not a question of good or bad functionality, it's more a question of what is best for your application. Most of the applications out there will be able to use the regular fingertips provided with your gripper and never have to worry about a proper grasp. Although, specific applications might have to use a fancier more dedicated fingertip to be able to reach their production goal or to ensure better gripping depending on the object or application.
Examples
Cylindrical Objects
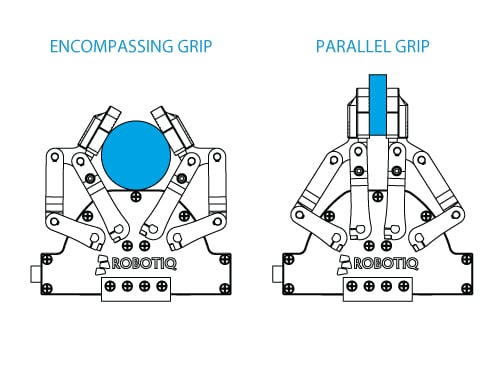
Most grippers out there (even ours) uses flat fingertips. Most of the time gripper manufacturers assume that the best way to grip something is by using flat tips. Although, when its time to grip round parts, the flat fingertips create a force only on a thin region of the part. To enhance the grasping technique you may want to either increase the grasping force or enhance the amount of surface that touches the parts. Most of the time, you will want to have more than two contact points or pressure areas grasping the part. To achieve this, the part can be grasped using the encompassing grip.This can also be achieve by using custom fingertips in a ''V'' shape.

By using this kind of fingertip, you get four pressure areas on your part. This means that the part is completely secure. By using the ''V'' shape instead of a round "C" shape it is possible to grasp a wider range of parts. The fingertips will be able to apply four pressure areas from small diameters to wider ones.
Large Objects
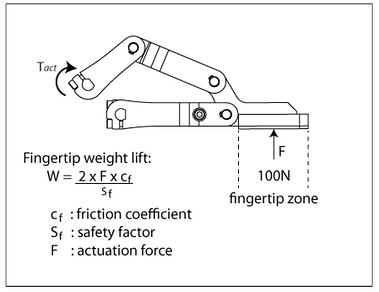
Big objects don't always mean heavy objects! Make sure to evaluate not only the geometry but also the weight of the object that has to be grasped by the gripper to make sure it will work out. In fact, a large lightweight part can be grasped depending on its specific geometry even using a small gripper.
Although if your big object is also heavy that's another thing. It is then important to consider the friction coefficient between the fingertips and the object. The more friction you have, the heavier the gripper can grasp. In fact, by using custom fingertips composed of a special rubber, for example, you can increase the friction coefficient and allow your gripper to carry a little extra part weight. A good post to review this in more detail can be found here.
Small Objects
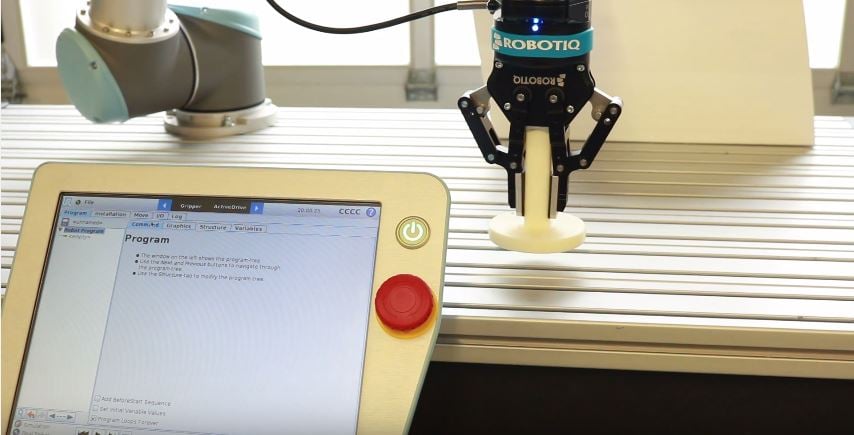
Small objects often mean you also have a small picking or dropping area. You don't necessarily want to use big fingertips to place a small electronic chip onto a tiny electronic board especially with other fragile components around it. This is why we recommend creating customized fingertips with a narrow gripping area (which also means a reduced fingerprint on the pick and place layer). This would allow the gripper to get through small areas without touching other components around it. Thanks to the adjustable stroke of the Robotiq Adaptive Grippers, this Gripper can open partially, thereby getting into and out of the small areas without occupying all the available space.
Small objects can also mean thin or fragile objects. To be able to grasp these kinds of objects without crushing them you can use the force and position settings of the Adaptive Grippers. In fact, to grasp fragile objects, using a smaller force at a given position, the Gripper will stop once it reaches the programmed setting. By doing so, the risk of mangling the part is quite low.
To create custom fingertips you can either use your own engineering skills with the data that is provided for you in the instruction manual of every Gripper or you can ask us about the different personalized fingertips we can offer you.
Parallel Mechanism
Our Gripper is popular with all types of industrial applications, because of its five linkage mechanism that allows it to adapt to the shape of objects. Although, the specifications of our Gripper make it useful for applications that don't need the five linkage mechanism too. Those applications are usually parallel gripping operations. This means that the five linkage mechanism has to become a four linkage mechanism to keep the fingers parallel to each other. Also, we do provide a locking pin mechanism for the 2-Finger Adaptive Grippers. Even if you don't use the locking pin, the parallel grip can still happen. The pin is only a supplementary security to ensure a constant parallel grip.
Make it Faster
One of the advantages our Gripper has compared to other grippers is the ablity to program our Gripper in a few clicks. By choosing the opening stroke, the force and the speed of the Gripper you can optimized your gripping operations with all the required settings you need. So, for example, to increase the rate of grasping you can either increase the closing speed or reduce the opening stroke. This second option, reducing the opening stroke, means that the Gripper can perform minimal movement before achieving a given position. The robot can then continue its motion when it receives the ''open'' signal. When you are automating your production, you don't want to lose a couple seconds per gripping operation when it's unnecessary.
These are just a few general tips but they can help you chop down time in your production and achieve your required lead time and production targets. Makes sure to contact your Robotiq vendor or our Robotiq support department to get more information on how to optimize your production.


Leave a comment